Troubleshooting Weighing Scales - The problem's obvious, right?...

A big part of my role here at AWM is communicating technical information and providing weighing advice to our dealers, but the part I find most interesting is Troubleshooting. Yes, there are many things that can go wrong with a scale, and there are many different types of scales, but I always say to my engineers "it's not rocket science". I encourage everyone to think logically and work through a process. It sounds simple but the first thing is to always start by checking the obvious, I mean the really obvious...is the indicator cable plugged in? Is there an obstruction beneath the base? Is there cable damage?

I remember many years ago, one of the engineers (who will remain nameless) came to me saying "the scale wont weigh, it's stuck at zero, I've tried everything". I went out to the workshop and sure enough there it was, a low profile
Detecto wheelchair scale with 300kg of weight loaded on it and a big fat zero on the display. I stood on it, no weight change. He said he had worked through the obvious issues, metered the cells, all looked fine, in fact it was new out of the box. We scratched our heads, what could it be, these are super reliable scales. I happened to look around and glance in the box and there sat...4 loadcell feet. Had he put the feet in the loadcells or the scale just sitting directly on the ground?... hmm, as I say, it's always best to check the obvious!
Oh and don't forget the old 'turn it off and turn it back on' too, it's amazing how many times that works!
As always, if you can't fix it, we are always on the end of the phone to provide advice or to talk through the issues you are seeing,
please call any of the AWM technical team anytime and we will be ready to help!
Other ways to find the information you need also include:
- Technical Manuals - These are all on our website but you do need to be logged in as a dealer. If you don't have one a login, please register, it is a great site, providing literature and links to the Youtube videos as well as parts pricing and the ability to order online.
- Youtube Channel - More and more of our 'How to' videos are being published on our AWM channel, these are useful for demonstrations or for setting up new scales.
- FaceTime or Skype from our Test Lab - We have an in-house test lab where we can set up indicators and projects to walk you through the configuration step by step. Give us a call on FaceTime or Skype and with video calls you can see the whole setup and configuration right in front of you!
- Service Training - Our partners are always welcome at our offices here in Bury St Edmunds for any type of training. Just drop in when you are passing or give me a call on 01284 701222 to arrange a time.
Using the inputs and outputs on a Cardinal 190 to trigger peripherals like buzzers or lights
Part 1. INPUTS - how to connect a remote button for remote tare/print etc.
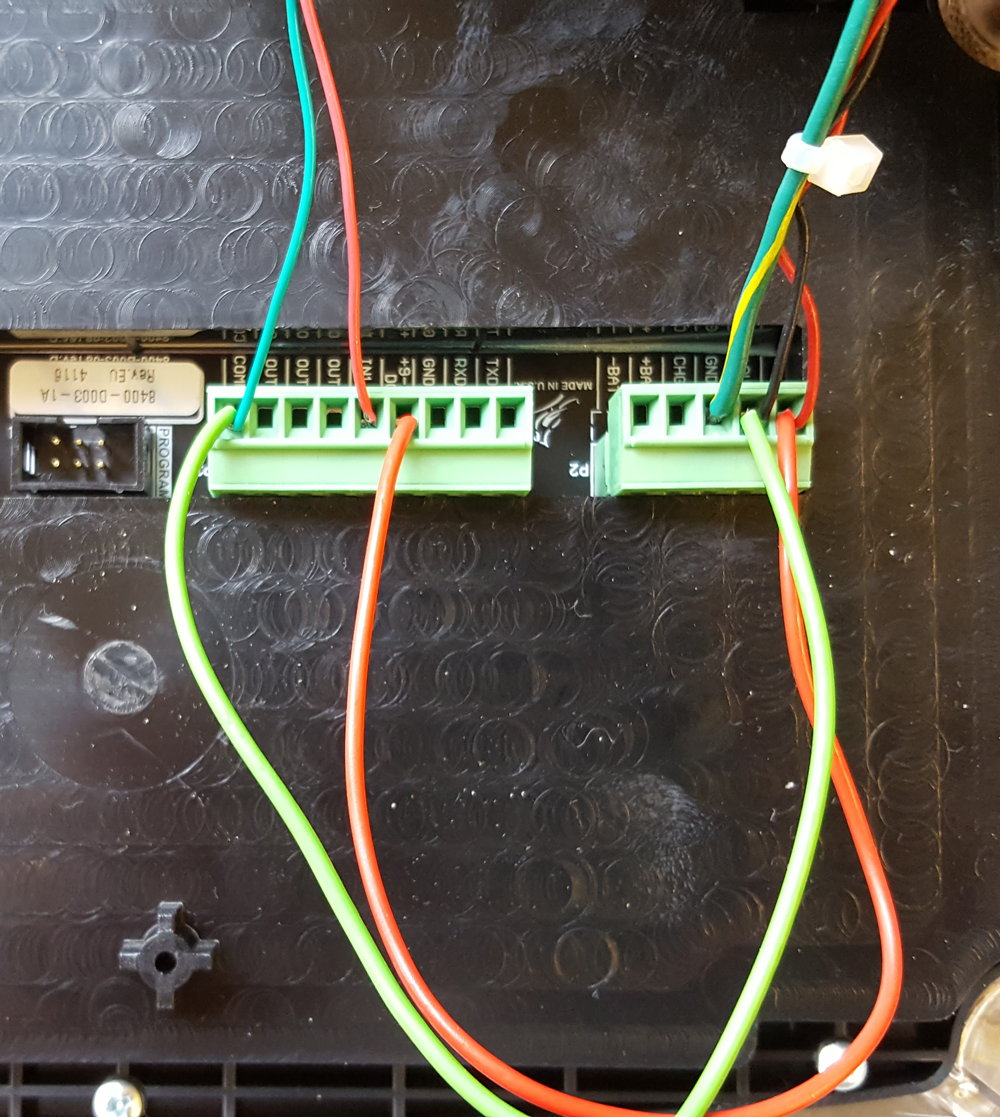
1. Provide power to the input connector by making a couple of loop wires, one from the +9V on the P2 connector to the +9-24DC on the P3 connector and one from the GND on P2 to COMMON on the P3 connector.
2. Now wire in your switch, one side to COM (common) on the P3 connector and the other side to IN1 (Input 1) on the P3 connector.
3. Once the button is wired in you need to tell the 190 what is going to happen when you press it. To do this enter setup by pressing and holding FN and then press ZERO while FN is still being held.
5. Screen will show td= . Press the TARE/ENTER button until you
see d in=, then press it one more time and you should see a 0 flashing.
6. The number you enter now for d in= depends on what you want the indicator to do when you press the button. The list is given in 190 manual on page 27.
0 = Digital Input is disabled
1 = ZERO key function is performed when input goes from open to closed
2 = PRINT key function is performed when input goes from open to closed
3 = TARE key function is performed when input goes from open to closed
4 = NET/GROSS key function is performed when input goes from open to closed
11 = ZERO key function is performed when input goes from closed to open
12 = PRINT key function is performed when input goes from closed to open
13 = TARE key function is performed when input goes from closed to open
14 = NET/GROSS key function is performed when input goes from closed to open
7. Change the number to what you want by pressing the FN button.
7. Once you've entered the option you want press the TARE/ENTER button until you return to the weighing screen.
8. Add some weight to the scale and once stable press the remote button!
Part 2. OUTPUTS - using one of the three outputs available on Cardinal 190 to connect a buzzer
Firstly just a reminder that you will need to put an additional gland in the back of the indicator for the output wire to come out. I am going to assume here that we are using an external power supply to run the buzzer.
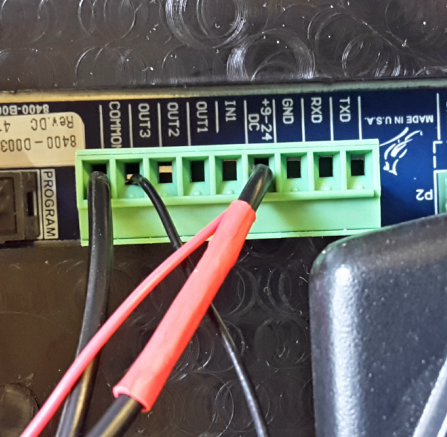
1. Connect the +DC of the external power supply along with the +DC for the sounder to the +9-24 VDC on the P3 connector. The maximum DC voltage that the 190 can handle is 24VDC and minimum is 9VDC.
2. Connect the negative of the external power to the common on P3.
3. Connect the negative of the buzzer to either output 1, 2 or 3 depending on when you want the buzzer to come on. Output 1 comes on when the weight is UNDER the target range, output 2 comes on when it is in the ACCEPT range and output 3 activates when the weight goes OVER.
4. Follow the steps 3-6 in PART 1 above and this time change d out= so that it shows 14.
The easiest way to setup weigh labels using the Baykon BX2X Indicators
When setting up a label form like we do in this video, it's always good to keep a list handy with all of the fields that the BX indicators can print:
- [N] Net weight
- [G] Gross weight
- [T] Tare weight
- [D] Date
- [T] Time
- [C] CN number
- [A] Alibi number
- [U] Unit
- [S] Scale no
- [Q] APW value
- [P] Pieces
- [1] ID1 (A) Name
- [2] ID1 (A) Data
- [3] ID2 (B) Name
- [4] ID2 (B) Data
- [5] C Name
- [6] C Data
- [7] D Name
- [8] D Data
Out of interest is you are using a Cardinal weight indicator for labelling then the similar software to use would be '
nControl'.
If you need any help or assistance on this, or for further information on the Baykon BX2X Indicators, Indface software, the Zebra Printers we offer, or any other products in our range you can contact me on mark@awmltd.com or call me on 01284 701222.
Look out for next months Tech Topics which will feature a Baykon BX24 operating a traffic light system
for
check-weighing!
As always, if you have any questions please do not hesitate to contact me. If there is anything specific you would like to see in Tech Topics then please just let me know.
Let's keep on learning!
All the best,
Mark