TECH TOPICS - A TECHNICAL WEIGHING BLOG
Welcome to Tech Topics Issue 4 - "It's good to torque". Yes, torquing - a highly important but potentially overlooked operation when assembling or repairing a weighing scale. Whether you are putting together a new scale or replacing a faulty loadcell on-site, in weighing (as in all manufacturing industries) ensuring correct Torque levels on critical fasteners is vitally important.
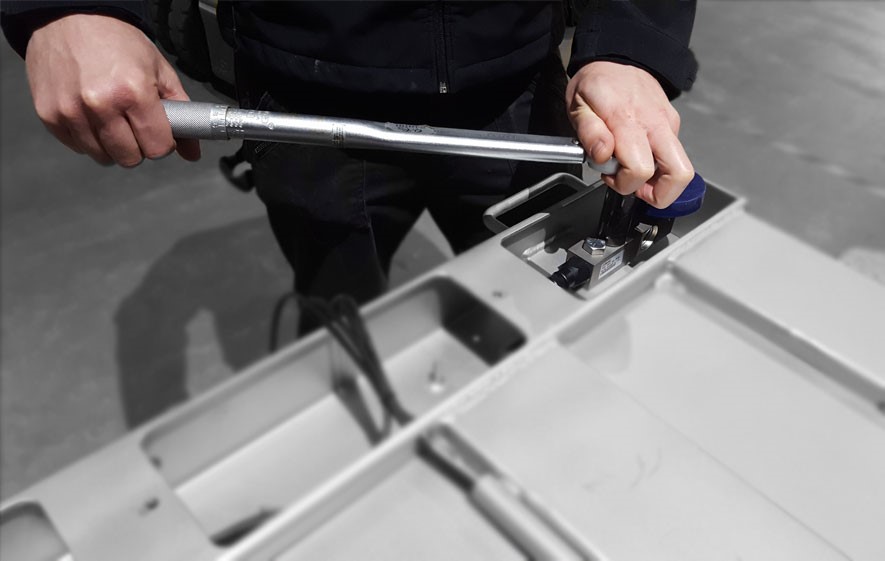
Both under torquing and over torquing a bolt could cause its failure, and when we are installing loadcells in weighing scales and talking upwards of 60,000kg of weight baring down on those bolts, we don't want them failing. Therefore always keep in mind, its good to torque and it is really important to tighten those bolts or nut to the manufacturer's specified values.
A brief overview of Torque in relation to loadcells and weighing scales
Torque is defined as a twisting force that causes rotation. When a socket is applied to a nut and turned down, the force rotates the bolt. Having the correct Torque settings on loadcells when installing into platform scales ensures the cells are secured sufficiently for optimal performance but not overtightened.
Why is it Torque in weighing scales so important?
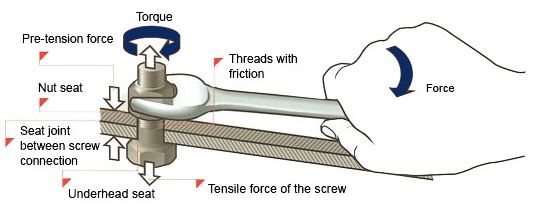
A bolt tensioned properly works at its optimum efficiency and will resist coming undone. However, if the tension is too low, the nut could vibrate or work loose. If the tension is too high (overreached), the bolt could break. Every bolt has a correct optimum torque/tension figure for each fastening application and it is important to have these figures available so that the finished product will be safe, efficient and economical to use.
Tech Tip: If you over torque the loadcells there is the chance of stripping the threads which may be dangerous and cause loadcell failures. If you under torque the cells they won't be correctly fixed which may cause them to move under load and create weighing inaccuracies.
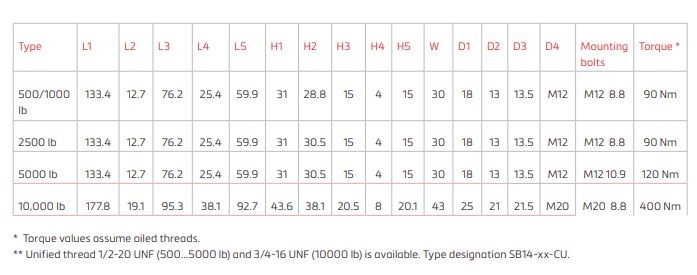
What Torque settings are suited to your loadcell?
The table below shows a clear example of the correct setting on the Torque for an SB14 Flintec loadcell for each capacity rating of the loadcell.
EC Class III Verification services from AWM Limited
AWM Limited are one of the first independent scale companies in the UK to achieve
Self Verification way back in 1994, we have maintained accreditation since, through the changes to both EN45501 and the Council Directives.
We have a comprehensive Method of Test which complies to the latest directive, we use a combination of weights and high-resolution modes to complete the verification, issuing a Declaration of Conformity upon completion. We maintain records for the required period and are very stringent in all aspects of this authorisation, recently praised for our high level of traceability.
A Compatibility of Modules to meet Welmec guidelines is completed prior to each verification to ensure the complete instrument will meet the essential requirements and can be submitted for verification.
Tech Tip: We do extend our AWM Limited EC Self Verification scheme to select trade partners, authorisation from our QA Manager and Managing Director must be obtained before we can officially confirm whether we are able to offer you the verification scheme.
Extension of the AWM Limited EC Self Verification Scheme to trade partners
1. Initial training is to be held at AWM Limited prior to inclusion into the scheme.
2. Refresher training / audit will be required each year, the location and details of the audit are at the discretion of AWM Limited.
3. A fee will be chargeable per scale for the verification kit which will include the verification forms in both printed and electronic format.
4. A composition of modules form will be required for each scale that is verified.
5. Should an additional inspection be required by the auditor of our SV scheme it would normally be held here at our office or as part of our AWM regular surveillance visit.
The scope of our AWM scheme will cover Initial verification of listed products supplied by AWM Limited, primarily Cardinal and Baykon OIML approved products together with re-verification within the UK of all the products listed, it is possible that this can be extended to include other manufacturers products provided we obtain authorisation.
Loading Software Applications into the Cardinal 825 Weight Indicator
Instructions for updating a 825 Custom Application
- Download the zip file from the email containing the custom application
- Open the file where you should find 1 or 2 files: "the application name" and "the application name.sgn"
- Copy the files onto a USB stick with a capacity of 4GB or less
- Put the USB stick into the base of the 825 indicator, preferably the one nearest the board
- Turn the 825 on
- Allow the 825 to auto run past the initial menu until you reach the application menu where there will be 3 blue icons
- Select File Manager.
- Enter the user information when asked;
- Username: ADMIN
- Password: 81440
- Select "Choose an update file from USB Flash"
- Confirm when prompted.
- Find the file you loaded onto the USB stick.
- When asked: "Run update script on USB? Yes/No" select Yes
- Press any key to continue
- When updated, return to the blue icon menu and load the new application.
Quick Tip: How to reset a P310 (GK420T) Zebra Printer!
Q. Why/when would you need to reset your printer?
A. If the printer was not feeding correctly, printing abnormally or you have changed label size.
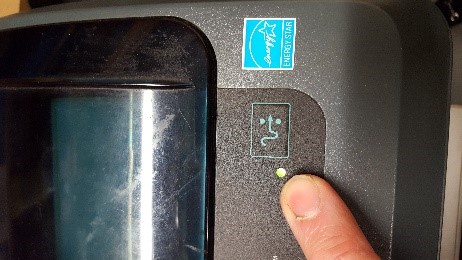
- Turn the printer on using the on switch (located to the rear of the device).
- Make sure there is a reel of labels in the printer before you start.
- Hold down the feed button found on the top of the printer for the duration of 2 LED flashes. (As shown in the image below).
- Release the button.
- The printer will then reset the media by feeding one or two labels straight away!
Thanks for reading the latest Tech Topics Blog post, as always you can email me with any questions or call +44 (0)1284 701222. Look out for the next blog post and let me know if there is anything you would like me to cover!

 Our trained engineers can self verify equipment here at our offices in Bury St Edmunds prior to delivery to yourself or drop-ship to your customers. We are also able to offer an on-site verification service.